Uberenv Guide
This documents the setup and usage of Uberenv..
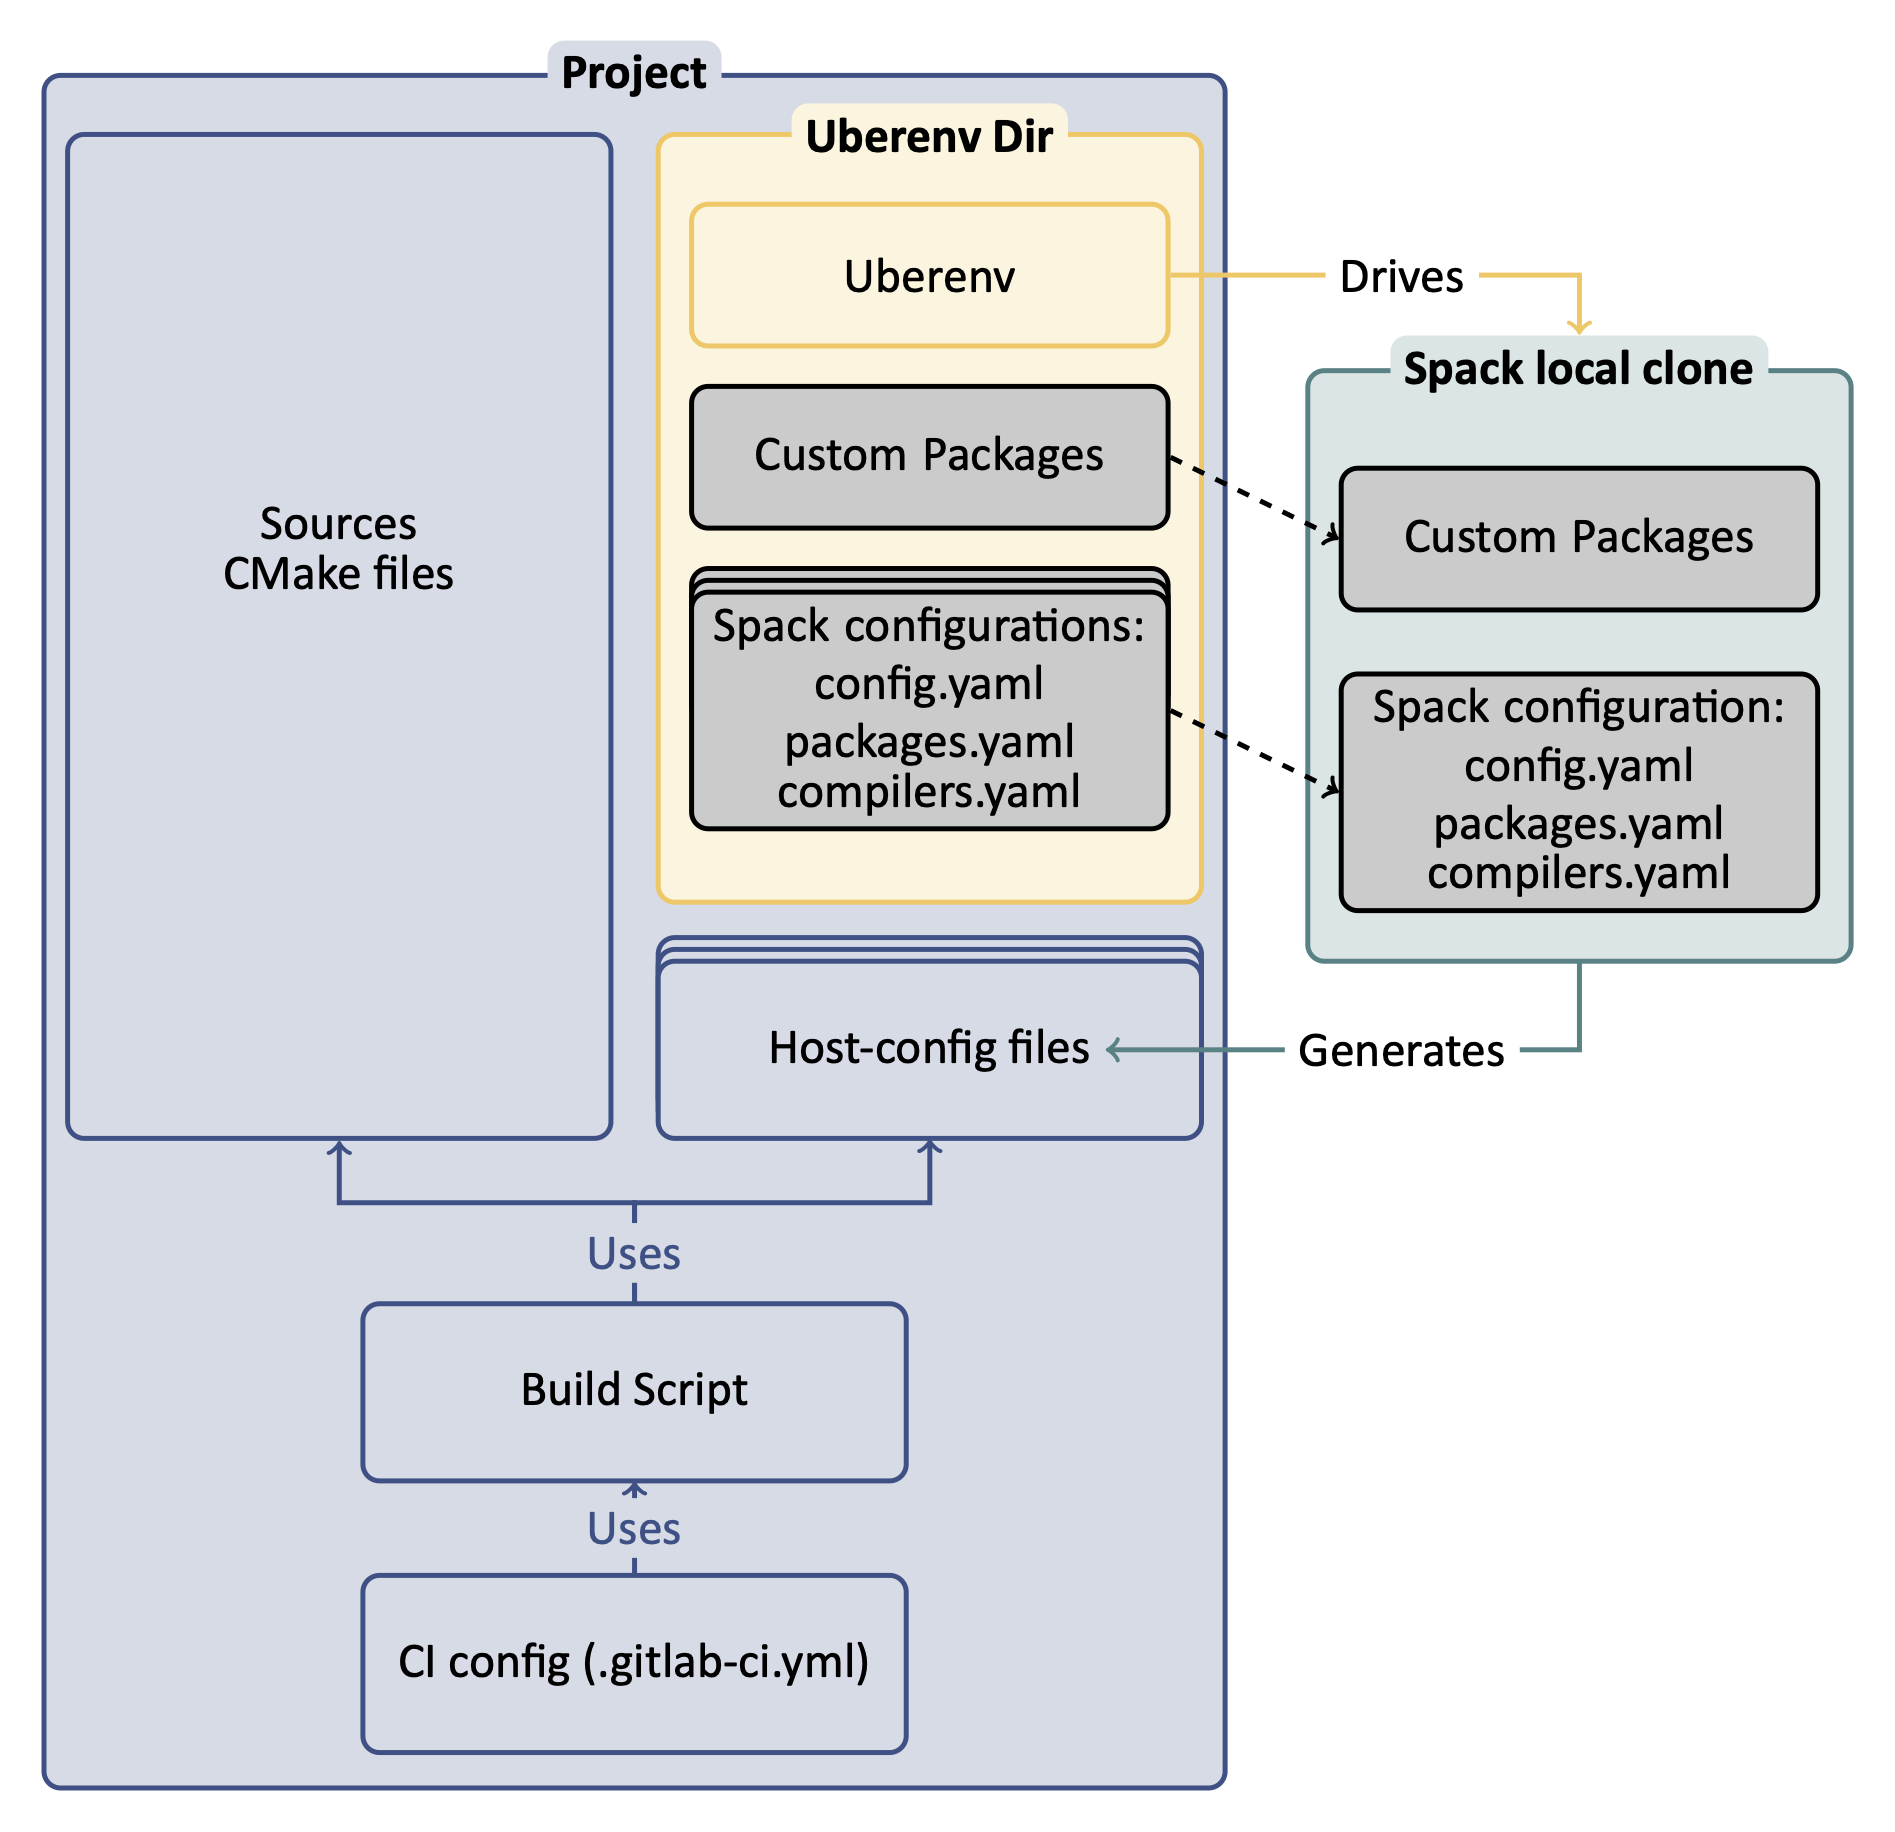
Uberenv can be used to generate custom host-config files, driven by a Spack spec. This host-config file will point to the dependencies installed with Spack, making the build process of the project straightforward.
Getting Started
Here are some preliminary steps to follow to setup Uberenv, depending on how you get Uberenv.
Getting Uberenv by clone/fetch/copy
Get uberenv.py script.
Clone/Fetch/Copy it from LLNL/uberenv into a
uberenvdirectory, not as a submodule.Edit uberenv/project.json.
Set your project package name, and other parameters like Spack reference commit/tag (we suggest the latest release tag).
Add radiuss-spack-configs submodule.
- Use
git submodule addto get radiuss-spack-config. - Create a symlink
uberenv/spack_configsthat points toradiuss-spack-configs.
- Use
Add custom packages.
If you need to make local modifications to your project package or a dependency package, you may put it in a corresponding directory:uberenv/packages/<package_name>/package.py.Make sure that <project>/package.py generates a host-config cmake file.
This is usually done adding a specific stage to the package (see for example the hostconfig stage in Umpire, CHAI, etc.).
Getting Uberenv as a submodule
Get uberenv.py script.
Use
git submodule addto get uberenv into auberenvdirectory.Edit .uberenv.json.
Create
.uberenv.jsonin a directory that is a parent ofuberenv. Set your project package name, and other parameters like Spack reference commit/tag (we suggest the latest release tag).Add radiuss-spack-configs submodule.
- Use
git submodule addto get radiuss-spack-config in a second submodule or custom location. - In
.uberenv.jsonsetspack_configs_pathto point to<some_path>/radiuss-spack-configs.
- Use
Add custom packages.
- If you need to make local modifications to your project package or a dependency package, you may put it in a corresponding directory:
<some_path>/packages/<package_name>/package.py. In
.uberenv.jsonsetspack_packages_pathto point to<some_path>/packages
Make sure that <project>/package.py generates a host-config cmake file.
This is usually done adding a specific stage to the package (see for example the hostconfig stage in Umpire, CHAI, etc.).
Generating <Project> host-config files
This mechanism will generate a cmake configuration file that reproduces the configuration Spack would have generated in the same context. It contains all the information necessary to build <Project> with the described toolchain.
In particular, the host-config file will setup:
- flags corresponding with the target required (Release, Debug).
- compilers path, and other toolkits (cuda if required), etc.
- paths to installed dependencies.
This provides an easy way to build <Project> based on Spack and encapsulated in Uberenv.
Uberenv role
Uberenv helps by doing the following:
- Pulls a blessed version of Spack locally.
- If you are on a known operating system (like TOSS3), we have defined compilers and system packages so you don’t have to rebuild the world, _e.g._ CMake, or MPI.
- Overrides <Project> Spack packages with the local ones if any. (see
scripts/uberenv/packages). - Covers both dependencies and project build in one command.
Uberenv will create a directory uberenv_libs containing a Spack instance
with the required <Project> dependencies installed. It then generates a
host-config file (<config_dependent_name>.cmake) at the root of <Project>
repository.
Note
One common source of error when using Uberenv is that the uberenv_libs
folder is out of date. To resolve, make sure this folder is deleted before
running new scripts for the first time because this folder needs to be
regenerated.
Before to start
Machine specific configuration
Depending on the machine/system, <Project> may or may not provide a spack configuration allowing to use uberenv right away.
Check in the machines/systems supported in scripts/uberenv/spack_configs.
Per machine, <Project> will provide compilers.yaml, packages.yaml, and
config.yaml. The latter being possibly shared with other machines/systems.
Vetted specs
Then, one can easily check what specs are tested in CI. For example, when looking for the gcc versions tested on quartz:
git grep "SPEC" .gitlab/quartz-jobs.yml | grep "gcc"
MacOS case
It is not trivial to provide a universal configuration for MacOS. Instead, the
developper will likely have to complete the packages.yaml file in order to
adapt the location and version of externally installed dependencies.
Using Uberenv to generate the host-config file
$ python scripts/uberenv/uberenv.py
Note
On LC machines, it is good practice to do the build step in parallel on a
compute node. Here is an example command: srun -ppdebug -N1 --exclusive
python scripts/uberenv/uberenv.py
Unless otherwise specified Spack will default to a compiler. It is recommended
to specify which compiler to use: add the compiler spec to the --spec=
Uberenv command line option.
On blessed systems, compiler specs can be found in the Spack compiler files in
our repository: scripts/uberenv/spack_configs/<system type>/compilers.yaml.
Some options
We already explained --spec= above:
--spec=%clang@9.0.0--spec=%clang@8.0.1+cuda
The directory that will hold the Spack instance and the installations can also
be customized with --prefix=:
--prefix=<Path to uberenv build directory (defaults to ./uberenv_libs)>
Building dependencies can take a long time. If you already have a Spack instance
you would like to reuse (in supplement of the local one managed by Uberenv), you
can do so with the --upstream= option:
--upstream=<path_to_my_spack>/opt/spack ...
Using host-config files to build <Project>
When a host-config file exists for the desired machine and toolchain, it can easily be used in the CMake build process:
$ mkdir build && cd build
$ cmake -C  <path_to>/<host-config>.cmake ..
$ cmake --build -j .
$ ctest --output-on-failure -T test
CI usage
In RAJA, Umpire and CHAI, Uberenv is used in CI context to automate both the installation of dependencies and the generation on the host-config files.
All this is managed through a single script, that is usable outside of CI.
$ SPEC="%clang@9.0.0 +cuda" scripts/gitlab/build_and_test.sh --deps-only
$ HOST_CONFIG=<path_to>/<host-config>.cmake scripts/gitlab/build_and_test.sh
Note
Making the CI scripts usable outside CI context is recommended since, by definition, it has been vetted. It also ensures that this script is usable in interactive mode, making it easier to test.
Debugging
In the workflow described above, there are 4 levels of scripts to control the build of a package. From the lower to the higher level:
- The build system is controlled by the host-config file (generated by Spack or not).
- The Spack package is controlled by the spec provided and the configuration.
- Uberenv takes a spec and a json configuration file.
- A build_and_test script also sometimes called test driver. The one in Umpire and RAJA requires a spec and some other control variables.
Now, when it comes to debugging, each level has some requirements to reproduce a failing build:
- The build_and_test script typically runs in CI context. This means that it may not be designed to run outside CI. It is better if it does, and we try to do that in RADIUSS, but it is not guaranteed.
- Uberenv is meant to provide a turnkey way to install the project and its dependencies. It is usually a good way to reproduce a build on the same machine. The CI creates working directories in which the uberenv install directory _may_ persist, but it is better to reproduce in a local clone.
- Reproducing a build with Spack requires a deep knowledge of it. But Uberenv helps a lot with that. We advice that you use Uberenv to generate the Spack instance. Then, loading the spack instance generated and working with it is safe.
- Going down to the build system is also doable, especially when using host-config files. Once spack has installed the dependencies and generated the host-config files, it can be used to control the build of the code and this should not require using Spack.